Getting the most out of Perk (formerly TravelPerk) comes down to following a clear sequence: get onboarded, build your profile, submit requests with the right cost codes, and let the platform handle the rest. Here's how that process works in practice.
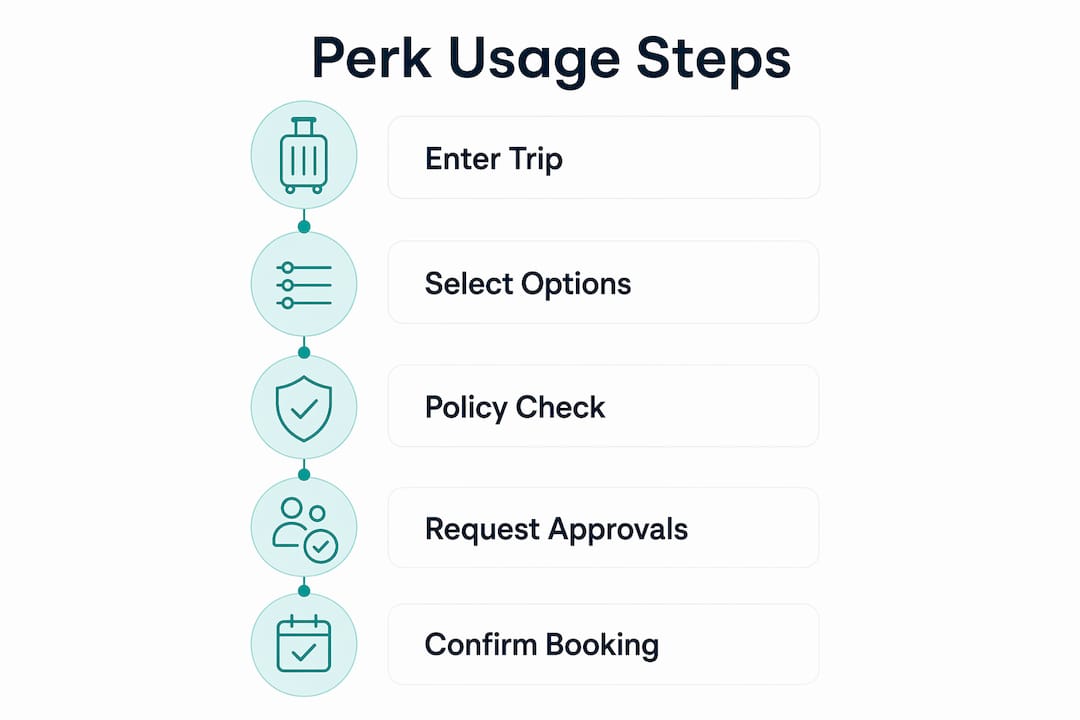
- Get invited and activate your account. Your admin sends an email invitation. Click the link, set your password, and select "Get Started." On first login, verify your name matches your travel document exactly, then add your date of birth, passport details, and any loyalty program numbers.
- Submit a trip request. Enter your departure city, destination, and travel dates. The platform compares options across carriers and accommodation providers. Select what fits your needs, then proceed to the approval stage.
- Assign the right codes. Every trip requires a donor and project code assigned to a cost center. Select the correct invoice profile and choose your approver from the dropdown. Without this step, no reservation gets confirmed.
- Wait for approval and receive your documents. Once your approver signs off, Perk auto-generates your e-ticket and routes the invoice to the correct entity automatically.
- Modify or cancel if plans change. Go to the Trips section, open the booking, and tap "Manage trip" to send a modification or cancellation request to the Customer Care team.
- Track expenses and access support. Perk's AI captures and categorizes expenses as you go. For urgent issues, the in-app chat connects you to a live agent around the clock.
What are the real benefits of integrating Ramp with Perk?
Connecting Ramp to Perk does more than sync data. It closes the gap between booking and accounting that usually costs finance teams hours of manual reconciliation every month.
- Automated invoice routing. Perk's AI matches, codes, and routes invoices for approval without manual input, cutting errors and processing time.
- Real-time spend visibility. Finance teams see every trip, card transaction, and invoice in one dashboard rather than chasing receipts across inboxes.
- Policy enforcement at the point of booking. When a traveler selects an out-of-policy option, Perk flags it visually and blocks confirmation until the issue is resolved or approved.
- Consolidated reporting. Travel managers can pull reports by department to track trip volume and spending, making budget conversations with leadership far more concrete.
Perk reports that preset approval workflows keep policy compliance at an average of 95%. That figure matters because most corporate travel programs struggle to hit 80% without automated controls. The Ramp integration pushes compliance further by syncing accounting fields directly, so the data your finance team sees in Ramp already reflects what was booked in Perk, with no manual export required.
Travel managers who track travel spending through integrated dashboards consistently catch budget overruns earlier than those relying on monthly expense reports.
How do you set up the Ramp integration with Perk?
The setup takes less than an hour if you have admin access to both platforms. Follow these steps in order.
- Enable Ramp integration in Perk settings. Log in as an Admin, navigate to Settings, and locate the Integrations section. Find Ramp in the list and toggle it on.
- Connect your Perk account to Ramp. You'll be prompted to authenticate with your Ramp credentials. Complete the OAuth authorization to establish a secure link between the two platforms.
- Configure synchronization preferences. Decide which data flows automatically: invoices, booking confirmations, cost center codes, or all three. Map your Perk cost centers to the corresponding Ramp categories so the accounting fields align.
- Test the data flow. Make a test booking in Perk and confirm that the transaction and invoice appear correctly in Ramp. Check that cost center codes, amounts, and traveler details transfer without errors.
- Train your team on what changes. Travelers don't need to do anything differently in Perk, but finance staff should know that invoices now arrive in Ramp automatically. A 15-minute walkthrough prevents confusion during the first billing cycle.
Pro Tip: Before going live, run the test booking with a real but low-cost reservation, such as a train ticket, so you can verify the full data flow without committing to a large expense.
How do travelers actually experience using Perk day to day?
The platform is built around the idea that a traveler should never need to open a second app or call an airline directly. In practice, that holds up for most scenarios.
- Trip requests take minutes. Travelers enter their details, pick from filtered results, assign the project code, and submit. The approval notification goes to the team leader automatically.
- The mobile app covers everything in transit. Flight status, gate changes, hotel directions, and digital tickets all live in one place. Travelers can also approve requests from their phone, which matters when a colleague needs a same-day booking confirmed.
- Loyalty programs require a manual step. Perk does not accrue points on your behalf. You need to add your loyalty numbers to your profile so they appear on each reservation. Hotels and airlines then credit the points directly to your account.
- Airbnb bookings need a one-time setup. For the first Airbnb reservation, travelers must link their work email to their personal Airbnb account and authorize trips@travelperk.com as a travel booker under Airbnb's "Travel for work" settings.
- Disruptions get handled in the app. The in-app chat connects directly to a Customer Care agent. One traveler, stuck in a client meeting, used the chat to get rebooked on a later flight in under 15 minutes without stepping out of the room.
Pro Tip: Use the in-app chat for any last-minute change rather than contacting the airline directly. Agents have access to your full itinerary and can often rebook faster than the airline's own support line.
For trips that blend business and leisure, pairing Perk's booking tools with a curated personal itinerary from Destlist's travel plans means you can handle the corporate side on Perk and the personal side without starting from scratch.

What does the booking process inside Perk look like?
The booking flow is linear by design. Each step gates the next, which prevents incomplete or non-compliant reservations from slipping through.
Travelers start by entering trip details: origin, destination, and dates. Perk searches across flights, hotels, trains, and rental cars simultaneously, presenting options ranked by price and policy fit. Supported rail operators include Amtrak, Eurostar, Deutsche Bahn, SNCF, and Trenitalia, among others, so multi-modal itineraries don't require a separate booking tool.
Once a traveler selects their options, the platform checks each against the company travel policy in real time. Out-of-policy selections get flagged with a red indicator before the traveler can proceed. This isn't a warning that appears at checkout. It appears at selection, so travelers can adjust before investing time in the rest of the flow.
The concierge tab handles requests that fall outside standard inventory: specific in-flight meals, extra legroom, late hotel check-in, or airport transfers. These go directly to the Customer Care team, who follow up with the traveler. For step-by-step trip planning that covers both the booking mechanics and the broader logistics of a business trip, building familiarity with this flow early saves significant time later.
User management runs on four fixed roles: Admin, Travel Manager, Booker, and Traveler. Admins invite users through Settings, assign roles, and optionally link each person to a cost center or travel policy. Billing is per completed trip, not per seat, so adding or removing users doesn't change your monthly cost directly. Teams beyond a few dozen travelers should consider enabling SCIM provisioning on the Premium plan to automate onboarding and offboarding.
Key Takeaways
Using Perk effectively requires completing the approval flow with accurate cost center codes, enabling the Ramp integration for automated invoice routing, and maintaining loyalty program numbers manually in your profile.
| Point | Details |
|---|---|
| Cost codes are mandatory | Every trip request needs a donor, project code, and approver before any reservation is confirmed. |
| Ramp integration automates invoicing | Connecting Ramp syncs booking data and routes invoices without manual exports, maintaining policy compliance at an average of 95%. |
| Loyalty numbers need manual entry | Add airline and hotel loyalty numbers to your Perk profile; the platform does not accrue points automatically. |
| In-app chat beats airline support | The Perk mobile app's chat resolves disruptions and rebookings in under 15 minutes in many cases. |
| SCIM provisioning scales user management | Teams with frequent onboarding cycles should enable SCIM on the Premium plan to avoid manual invitation overhead. |
When your next trip goes beyond the corporate itinerary, Destlist builds custom travel itineraries tailored to your schedule, budget, and travel style, delivered within 24 hours.