
The single habit that removes hotel-booking chaos is building a master itinerary the moment you confirm a reservation. Not a folder of forwarded emails. Not a screenshot buried in your camera roll. One file that holds every confirmation number, cancellation deadline, room request, and front-desk phone number, synced to your phone for offline access.
You can start in under 10 minutes:
- Open a spreadsheet (Google Sheets or Excel), name it after your trip, and paste in your first confirmation number, the cancellation deadline, and the hotel's direct phone number.
- Save the file to Google Drive or OneDrive and enable offline access on your phone.
Pro Tip: Set a calendar reminder the moment you enter a cancellation deadline. If the deadline is 48 hours before arrival, the reminder fires automatically and you never miss a free cancellation window.
That one file is your travel itinerary foundation. Everything below builds on it.
Table of Contents
- Your hotel booking checklist: what to record at every stage
- How to build your master itinerary (spreadsheet + cloud + offline)
- How to book each hotel and what to record afterward
- How to check the final total before you pay
- [Reconfirming, changing, and canceling: timelines and documentation are critical steps to ensure your reservation stays secure, as detailed on the Explaining Digital Reservations page.](#reconfirming-changing-and-canceling-timelines-and-documentation-are-critical-steps-to-ensure-your-reservation-stays-secure-as-detailed-on-the-explaining-digital-reservations-pagehttpswildfoodzcom20260611explaining-digital-reservations-travelers-know)
- Which tools help you manage reservations, and when should you use a service?
- Day-of and day-before steps to avoid check-in problems
- Key Takeaways
- What experienced planners actually get wrong about hotel bookings
- Destlist handles the itinerary so you can focus on the trip
- Useful sources and templates to implement this now
Your hotel booking checklist: what to record at every stage
A good hotel booking checklist covers three moments: before you book, during checkout, and right after you confirm.
Before you book:
- Dates, number of guests, and room type needed
- Non-negotiables (workspace, accessibility features, pet policy)
- Map the location relative to your actual plans, not just the city center
- Run a 5-minute hotel check: guest photos, real neighborhood, room size, final total with fees, and whether a refundable rate exists
During booking:
- Final total including taxes, resort fees, and any mandatory charges
- Cancellation policy type (refundable vs. nonrefundable) and exact deadline
- Deposit or hold amount and which card it hits
- Payment method accepted
After confirming:
- Confirmation number and booking URL
- Hotel's direct phone number and email
- Any special requests you submitted and whether they were acknowledged
- Receipt or booking summary saved to a dedicated folder
Pro Tip: Create a single "Cancellation Deadline" field in your spreadsheet and link it directly to a calendar event. One click, and the reminder is set.
How to build your master itinerary (spreadsheet + cloud + offline)
Switching from a pile of travel apps to one well-structured spreadsheet reduces app fatigue and keeps everything accessible offline. Here is how to build it from scratch.
Spreadsheet structure: Create four tabs: TRAVEL (flights, trains, transfers), LODGING (every hotel row), ACTIVITIES (day-by-day plans), and BUDGET (costs and running total).
For the LODGING tab, use these columns:
- Property name, city, check-in date, check-out date
- Confirmation code, booking channel (direct, OTA, travel agent)
- Rate type (refundable/nonrefundable), cancellation deadline
- Total cost including taxes and fees, deposit/hold amount, card used
- Front-desk phone, front-desk email, special requests, receipt link
Setup steps:
- Open Excel or Google Sheets and create the four tabs above.
- Save to OneDrive or Google Drive and turn on AutoSave.
- On your phone, open the app and select "Make Available Offline" for the file.
- Enter your first hotel row completely before moving on.
- Share the file with any travel companions and set view-only or edit permissions as needed.
For international trips, add a currency column next to the cost column. Use ISO codes (USD, EUR, GBP) rather than symbols to avoid confusion when the file is opened on different devices.
Pro Tip: Use a consistent date format across every row. For international trips, write dates as DD-MMM-YYYY (e.g., 14-Aug-2026) to eliminate any ambiguity between US and European formats.
Centralizing bookings, receipts, and price alerts in one place lets you spot rebooking opportunities and compare all-in costs at a glance, which matters most when you are managing three or four hotels across a single trip.
How to book each hotel and what to record afterward
OTA vs. direct booking: Use meta-search tools like Google Hotels or Kayak to establish a market rate baseline. Once you identify a property, check the hotel's official site for direct-booking perks: member rates, free breakfast, room upgrades, or flexible cancellation terms that OTAs do not offer.
Quick decision rules:
- Book direct when the hotel matches the OTA price and offers a loyalty benefit or better cancellation terms.
- Book via OTA when the rate is meaningfully lower and the cancellation policy is identical.
- Always verify the final price and cancellation policy on whichever channel you use before paying.
After confirming, record these fields immediately: rate type, cancellation deadline, deposit amount, estimated incidental hold, loyalty program number, and whether your room request was acknowledged in writing.
Email template for special requests or reconfirmation:
Subject: Reservation Confirmation Request — [Your Name], Arrival [Date]
Hello, I have a reservation under [Your Name], confirmation number [XXXXX], arriving [Date]. Could you please confirm the reservation is in the system, note my request for [room type/floor/accessibility need], and advise the estimated incidental hold amount? Thank you.
Pro Tip: Never send card details by email. If a hotel's website lacks a secure payment form, call the front desk and give the number verbally. Per Rick Steves' reservation guidance, phone is the safer channel for card information, and you should always request written confirmation for any cancellation.
How to check the final total before you pay
Advertised base rates routinely exclude resort and destination fees, which are collected at the front desk rather than during online checkout in many U.S. cities. A typical nightly rate can look very different once you add resort fees, city taxes, parking fees, and an incidental hold.
Example calculation:
| Cost Item | Amount |
|---|---|
| Base room rate (3 nights) | a base room rate |
| Taxes (variable rate) | taxes |
| Resort/destination fee | resort/destination fee |
| Parking (3 nights) | parking |
| Incidental hold (refundable) | incidental hold |
| Out-the-door total | out-the-door total |
The incidental hold is refunded after checkout, but it ties up funds on your card during the stay.
Steps to verify fees before booking:
- Click through to the checkout step and read the full price breakdown.
- Search the hotel's policy page for "resort fee," "destination fee," or "amenity fee."
- If the fee is not listed online, call the front desk and ask directly.
- Log each fee type in your itinerary's BUDGET tab.
Pro Tip: Check the final checkout step before you pay, not just the search results page. Fees that appear only at checkout are the most common source of booking regret.
For a full breakdown of how to track these costs across a trip, the travel budget review guide on the Destlist blog walks through the math in detail.
Reconfirming, changing, and canceling: timelines and documentation are critical steps to ensure your reservation stays secure, as detailed on the Explaining Digital Reservations page.
The standard rule: contact the property 72–48 hours before arrival. Call the day of if you expect to arrive after 6:00 PM.
| Timing | Action |
|---|---|
| At booking | Save confirmation email; log cancellation deadline in itinerary and calendar |
| 72–6 hours before arrival | Verify booking still shows in hotel's system; recheck cancellation terms |
| 72–48 hours before | Call or email to reconfirm; confirm room requests; ask about check-in time |
| 24 hours before | Save offline copy of itinerary; confirm parking or shuttle |
| Day of | Call if delayed; have confirmation number ready at front desk |
When you cancel, always request a cancellation confirmation number in writing. Log it in your itinerary immediately. A verbal cancellation with no written record is not a cancellation you can prove.
"Reconfirm reservations a few days before arrival, prefer phone for secure card details when a website lacks a secure form, and always request written confirmation for cancellations." — Rick Steves
For group bookings or multi-city trips, one person should own the master itinerary and be the single point of contact with each property. Shared edit access on Google Drive or OneDrive works well, but designate one owner who controls the final version.
Which tools help you manage reservations, and when should you use a service?
DIY tool categories:
- Meta-search price alerts — (Google Hotels, Kayak): monitor rate drops on booked properties
DIY works well for infrequent travelers, budget-conscious planners, and anyone who enjoys the process. The spreadsheet approach described above covers most needs.
The case for a planning service is different. If you are managing a multi-city trip with four or more hotels, coordinating group travel, or simply do not want to spend hours cross-checking fees and cancellation windows, a service that does the work for you is worth considering. Destlist builds AI-assisted, human-verified itineraries that include hotel matching, deadline tracking, and offline-ready plans, so the master itinerary arrives ready to use rather than ready to build.
Pro Tip: Book a refundable rate to hold availability, then set a price alert on the same property. If the price drops, rebook at the lower rate and cancel the original. This costs nothing extra and occasionally saves a meaningful amount.
Day-of and day-before steps to avoid check-in problems
The day before arrival:
- Reconfirm the reservation by phone or email
- Ask the hotel about early check-in availability if you need it
- Save an offline copy of your itinerary to your phone
- Verify your payment card is active and has enough available credit for the incidental hold
The day of arrival:
- Call the hotel if you expect to arrive after 6:00 PM
- Know the check-in cutoff time (some budget properties release rooms after a certain hour)
- Have your confirmation number visible on your phone, not buried in email
- Confirm parking, shuttle, or self-park arrangements before you leave for the hotel
Pro Tip: For late arrivals, give the front desk your estimated arrival time and a cell number. Small properties and boutique hotels sometimes have unstaffed front desks after 10:00 PM. A quick call prevents a locked door.
For group trips, assign one person to hold the master itinerary and communicate with each property. Everyone else gets a read-only copy. This prevents conflicting calls to the front desk and duplicate check-in attempts. The multi-trip planning guide on Destlist covers this workflow in more detail.
Key Takeaways
A master itinerary with cancellation deadlines, fee totals, and offline access is the single most effective system for managing hotel reservations without day-of stress.
| Point | Details |
|---|---|
| Build a master itinerary | Store confirmation numbers, cancellation deadlines, and front-desk contacts in one spreadsheet synced offline. |
| Check the final total | Always click to the checkout step to capture taxes, resort fees, parking, and incidental holds before paying. |
| Reconfirm 72–48 hours out | Contact the property directly; call the day of if arriving after 6:00 PM. |
| Document every cancellation | Request a written cancellation confirmation number and log it in your itinerary immediately. |
| Use Destlist for complex trips | Destlist delivers human-verified, offline-ready itineraries with hotel matching and deadline tracking built in. |
What experienced planners actually get wrong about hotel bookings
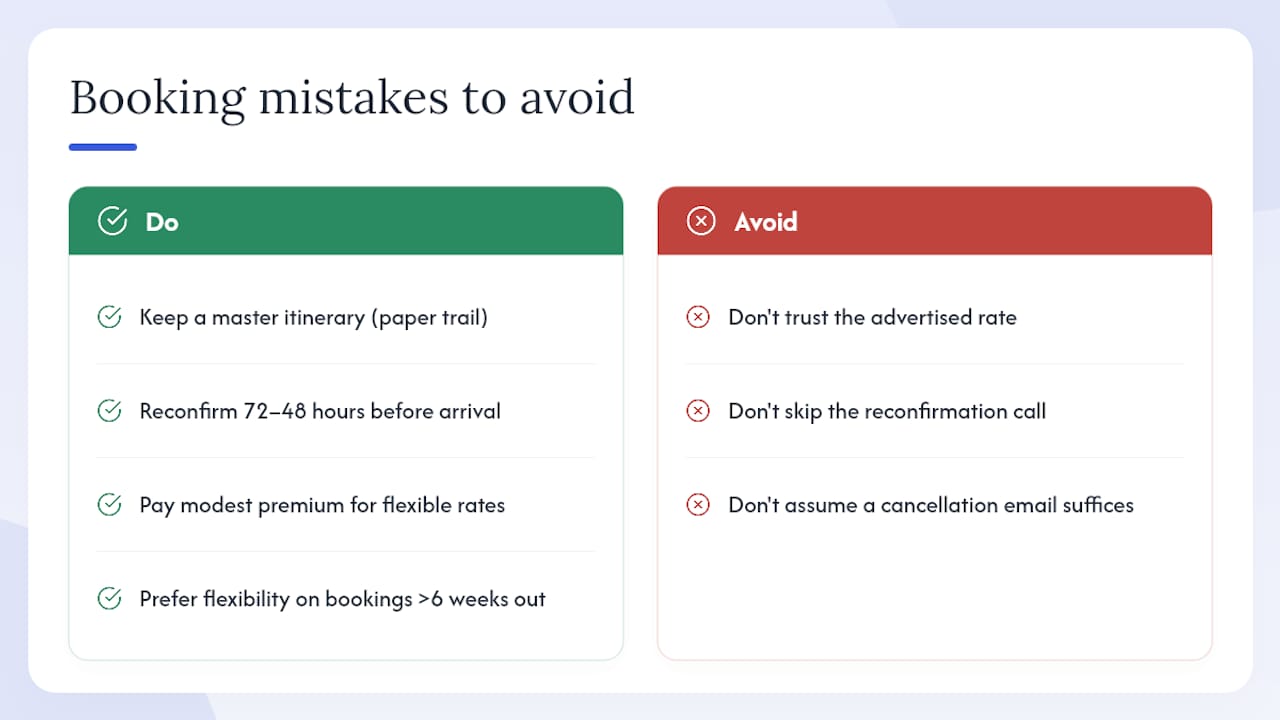
Most travelers who lose money on hotel bookings do not lose it because they forgot to book. They lose it because they trusted the advertised rate, skipped the reconfirmation call, or assumed a cancellation email was enough.
The master itinerary is not a productivity trick. It is a paper trail. The travelers who benefit most from it are not the ones who forget things; they are the ones who deal with hotels that forget things. A front desk that has no record of your room request, a resort fee that appeared nowhere in the booking flow, a cancellation that was "processed" but never confirmed in writing — these are not rare edge cases. They happen on routine trips.
The reconfirmation call 72–48 hours out is the most underused tool in this entire system. Most people skip it because the booking is confirmed and they assume that is enough. It is not. Calling gives you a chance to catch errors before you are standing at the front desk at 11:00 PM with no room.
One more thing: flexible rates are worth paying a modest premium for, especially on trips booked more than six weeks out. Prices drop. Plans change. A refundable rate gives you the option to rebook at a lower price or cancel without penalty. That flexibility has real dollar value, and most travelers underestimate it until the first time they need it.
Destlist handles the itinerary so you can focus on the trip
Planning a multi-hotel trip the right way takes real time: building the spreadsheet, verifying fees at checkout, setting cancellation reminders, reconfirming each property, and keeping the whole file updated when plans shift. Destlist does all of that for you.
A custom Destlist itinerary includes hotel matching aligned to your budget and preferences, human-verified special requests, consolidated booking links, and an offline-ready plan delivered within 24 hours. For travelers who book one or two trips a year and want a clean, ready-to-use plan, the one-off option works well. Frequent travelers get more value from a subscription, which covers multiple trips and includes ongoing itinerary updates. Browse curated trip plans to see the finished product before you commit.
Useful sources and templates to implement this now
The recommendations in this article draw on a short list of practical sources worth bookmarking:
- 9 U.S. cities where hotel resort fees keep rising
- Making reservations | Rick Steves
- What to Check Before Booking a Hotel: 2026 Checklist | Travel Radar LK
- How to Book a Hotel: The Ultimate 2026 Guide to Smart Travel Planning, Hidden Fees, and AI Search | Hotelora Blog
- Our 8 Best Hotel Booking Tips: A Frequent Traveler’s Guide — LiAnn and Theo Travel
- Build a Travel Dashboard for Flights, Hotels & Receipts
- Hotel booking sources
For Destlist-specific templates and itinerary formatting advice, the itinerary planning workflow guide and the travel spending tracker are the two most directly useful starting points.